SandovalCurse (talk | contribs) |
SandovalCurse (talk | contribs) |
||
| Line 214: | Line 214: | ||
More to Explore? - Go ahead, wander aimlessly for a bit. Surely something has opened up, right? Hmmm. Same old places — just a little noisier with all that equipment running. Time to slow down and think about the situation. |
More to Explore? - Go ahead, wander aimlessly for a bit. Surely something has opened up, right? Hmmm. Same old places — just a little noisier with all that equipment running. Time to slow down and think about the situation. |
||
| − | ===Story Bits=== |
+ | ====Story Bits==== |
The equipment here was used primarily for hunting and processing the giant creatures that flew here. The huge ominous hooks were baited with Arai and moved into position to fish the beasts from the sky. You can see (and take advantage of) the huge chains used for capturing and transporting the creatures for processing. |
The equipment here was used primarily for hunting and processing the giant creatures that flew here. The huge ominous hooks were baited with Arai and moved into position to fish the beasts from the sky. You can see (and take advantage of) the huge chains used for capturing and transporting the creatures for processing. |
||
====Gameplay Hints==== |
====Gameplay Hints==== |
||
Revision as of 21:15, 1 September 2016
Intro
Getting Started
You find yourself in what might be a familiar wooded area by a lake. This is Earth, and as you wander around you’ll realize that this is just one place that people have been taken from. There are signs and picnic tables and a camp fire… oh, and some kind of crazy light that shoots out of the sky and seems to get closer as you explore around. Use the area to pick up a bit of the story, and become familiar with moving around. You’ll be taken from here soon enough — when the light catches up with you. More Help: Hints and Bits
Story Bits
The red bar above means you’ve reached a Help section — proceed with caution. Anything after the red bar has the potential to be a spoiler. If you want a more pristine experience you can jump ahead to the next green bar.
This story is about you. The intro in the forest represents your experience of being taken far from home by an organic looking artifact that interrupted your life. You don’t know where this artifact came from, or why it came to you. But this will be your story now. The Help sections all have this Story Bits section where you can get some revelations about the story…
Gameplay Hints
… and this Gameplay Hints section where you can get some hints about Gameplay. These hints assume that you’ve done all the exploring you can stand to do, and you need a bit more to get you over a hump. If you haven’t explored, you really should — you may come up with a solution, and you’ll feel really good about yourself. But if you’ve explored, and slept on it, and didn’t have any brilliant insights in the shower, then you’ve come to the right place.
Welcome to Hunrath
Far From Earth - Battened Down
Remember, this guide will first try to give you some subtle clues. So, here at the beginning, the most we can say is… go… walk… explore… you’re bound to find something. We’ll give you just a bit here at the beginning to get you started. Now… baby steps…
Red Rocks - This entire place seems to be from southern Utah or somewhere in Arizona. There are definitely a few things that seem out of place.
- Welcome Message - If you weren’t welcomed to Hunrath, you weren’t paying attention. Whether you were welcomed or not, this place seems not very welcoming. Seems kind of deserted.
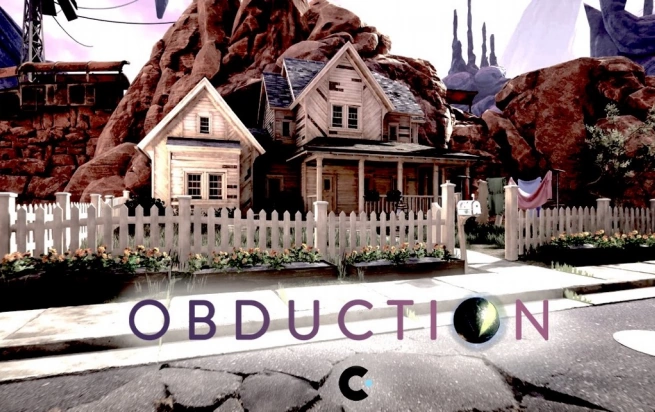
- Farley’s House - Yep, there’s that house with the white picket fence. But it’s locked up tight. Maybe later. But at least check out the mailbox, and oh yeah, another strange message kiosk in the yard.
- Graves and a Wall - To the right of Farley’s house is a strange graveyard, but beyond that is a strange border or edge. Seems like you could walk right out into that crazy alien landscape… worth a try.
- Downtown Ghost Town - Now you’re getting somewhere. Downtown Hunrath, with people everywhere… or maybe - not. As you tour this metropolis, make sure you catch one of the highlights…
- The Tree - To the right of downtown Hunrath is a fairly large tree. Seems important, you should go check it out, as much as you can.
- Red Beams and Blue Blobs - If you haven’t seen the red beam yet, you just aren’t paying attention. And the red beam has
- a blue beam nearby, and a blue blob. Good thing you don’t die easily in Obduction because
- the blue blob looks menacing.
- Compound with a Waterfall - If you walked past the blue blob, you have a compound of sorts to explore. Make sure you see
- everything, but note that the power lines lead to a small shack - don’t forget that fact, or what you find in the shack.
- Gates and Flow - Beyond the compound and the windmill and garden is a lovely little river area. And the river flows under some kind of crazy rigged-together structure. And the power lines run to the other side… just saying.
Story Bits
Welcome to Hunrath — some kind of kludgy home for abductees. Hunrath appears to have been a functional community that has recently been evacuated for some kind of battle — with the Mofang — whoever that is. Mayor Josef’s kiosk messages seem a bit weird — like he takes his position a bit too seriously, maybe. And the imagers themselves are a strange conglomeration of old earth technology melded with some advanced alien stuff.
Caroline Farley seems interesting. She has a nice house, but it’s locked up tight. And she’s managed to leave you a snippet of a warning about the battle — and not trusting people. It was her voice during the intro in the forest by the lake.
The old Hartnell mining town was scooped out of Arizona one night, with the town, the people, and the mining equipment — including the rails. And a graveyard came along as well, and it appears to have been used and reused; this place has been here for a while.
The only live person you meet is a southern gentleman, behind a huge vault door, in a compound whose gate is guarded by a strange blue blob. He seems honest enough, if a bit crotchety, and he’s intent now on going home. Can you trust him? For now, you don’t have much of a choice. And beyond the crazy desert landscape lies a bizarre, purplish, alien landscape. But you can’t seem to get there right now. And there’s a giant tree in the center of everything that is the lifeblood of this place.
Gameplay Hints
Wait! You’re using the hints already? Might we suggest you take one last look around this area. There are lots of details around that connect together. If you’ve had coffee, or a carrot, or a good night sleep, and you’re clueless, and frustrated, and ready to give up, then please proceed… Subtle Nudge: Do you know what your goal is? Perhaps you forgot what the guy behind the door wanted you to do. Go check with him again. Gentle Push: Power and power lines. Seems like the key to that is beyond that strange gate on the river.
Loving Shove: That strange gate is the key. The corrugated metal panels can be moved down into the water. Would they catch any current? Body Check: That gate can be moved — it rotates around the central pivot point. And the force of flowing water can make that happen.
The Other Side of Hunrath
Well, you made it. Congratulations! Don’t get cocky! Don’t forget what your goal is, but if you do — well there is always that strange dude behind the vault door in the shack. He said something about power, and this section is all about paying attention to connections.
- The Bosque - Just relax and enjoy this beautiful oasis here in the desert landscape. Just a short reprieve from the hustle and bustle of opening doors and turning on power. Okay, now back to work.
- Giant Stone Sphere - Wow. That’s a large stone sphere sitting on a strange platform. There’s a crazy track underneath it, the power lines even go to it, and you can explore it. Seems alien.
- Junkyard - There’s a fence to the left that surrounds a bunch of junk. Can’t seem to be able to get in there, but don’t forget to look up as you follow the fence line — those power lines seem to converge. And there’s a large electrical cable on the ground, coming out of the spot where they converge.
- Train Yard - Here’s something you don’t see every day - a huge chunk of a train yard scooped out and plopped in front of us — complete with most of a diesel locomotive. Seems like a good thing to examine. Wait, is that a pipe?
- Gas Station - Another strange scoop of Earth, complete with tanks, pumps, and a closed garage door. There’s some strange stuff inside there, but it seems to be locked up for now. What you need must be outside.
- The Humming Tower - Find your way through the train yard and past the portion of brick building. The most interesting thing is the huge humming tower in the middle of the water — but no way to get there from here.
- Beyond the Tower - Pretty stark out in this area, but exploring reveals a few things of interest amongst the canyons. First, there’s a door in a shallow rock cave, that’s locked with a keypad. If only there was a map to give you a lay of the land. Wait, didn’t you see a rough map somewhere? Further on through the canyons you run into that crazy undulating wall that keeps you from getting into the alien landscape.
Story Bits
In case you failed to notice, Hunrath seems to have been split down the middle by an old wall that bisects this giant sphere. It was built long ago as a way to protect and divide Hunrath. Check out the map on the electrical box for a rough layout.
After passing through a peaceful cottonwood bosque along the river, this back side of Hunrath seems more like the business or warehouse side. There are pieces of a scrapyard, a gas station, a railroad yard, and giant stone sphere. And handily, someone has gone through a lot of trouble to string electricity to various locations.
This whole place is such an odd juxtaposition of technology and history. Items seem to have come from all over earth — with some odd alien stuff thrown in for good measure.
Gameplay Hints
Are you sure? Have you thought about your goal, and connecting things to make that happen? Okay, okay… Subtle Nudge: Remember your goal? Come on! That guy behind the door? Go check with him again.
- Gentle Push: Power, power lines, connections. Follow the power lines — they converge, and an electrical cord snakes along the ground. You should follow that line.
- Loving Shove: So that diesel locomotive has a big generator in it. That seems like a good place to get power from. You should get that thing started.
- Body Check: Electrical power from a diesel locomotive — you’re going to have to pump some fuel to it, prime it, and start it. How hard can that be? Complicated?
A Wall In Every Direction
Good job, power is on! Seems like a good time to see what effects that might have. And remember that spot where the power lines converge, near the Junkyard? You probably should check that out. But when all is said and done, you probably want to go back to the guy who told you to turn on the power.
- C.W. - Okay, when you ring this guy’s bell again, he comes back with some more info. Listen carefully, because he’s not just whistlin’ Dixie — he’s got another request for you regarding a red beam and the wall around this place.
- The Workshop - No need to go too far from C.W.’s shack before you find some more to do. Having the power on will definitely open some doors. And once you find your way to the shop, settle in and explore the various devices and journals and notes. Spend some quality time here, learn the devices and take a few notes. It’ll serve you well.
- Ride the Rails - If you explored the workshop area enough, you found a way to get a vehicle to ride the rails. This ought to be fun! But before you go riding off into the sunset, remember what your goal is and what you learned in the workshop.
- Through the Dome - We’ll just assume at this point that you did what your were supposed to, got things figured out and got through the wall of the dome somewhere. If you didn’t, well what are you waiting for?
Story Bits
Looks like the guy behind the vault door is C.W. He was waiting for people to return, but they never showed up. This entire area within the fence is his compound. He’s evidently pretty handy — seems to have had a large part in putting together much of the technology that you see here. He built the crazy kiosks — hacking the red-beam Mofang technology to project moving or still images, and to aim upward to disable the wall of the dome.
C.W. has also rigged up some blue-beam Villein technology to an old mine cart. It’s a disabling beam of sorts — it disables Mofang technology. It’s interesting that he set it up to aim right at the opening into his compound.
C.W. and Farley seem to have gotten along just fine, although she’s not as comfortable as the mayor about recording imager messages. Farley was curious about why the Sorians would be giving them the imager technology — is that pertinent?
Gameplay Hints
Don’t get lazy now. There are some patterns you should be noticing - like the fact that C.W. seems to be trying to keep you on task. If that’s not enough then, okay, proceed…
- Subtle Nudge: Your goal! Something about the red beam and the wall of this place. Just saying. You could have checked with C.W., but we just saved you the trouble. You're welcome.
- Gentle Push: The goal is to get through the wall of this place - the edge between this place and the alien landscape. The key seems to be the red beam. What might disable that red beam?
- Loving Shove: Disabling that red beam is exactly what you want to do. The key to disabling the red beam was something you read about and even possibly experimented with in the workshop. Think blue.
- Body Check: Alright, here’s the deal. The red beam is based on alien technology that can be disabled with the blue beam. You should be able to use that blue beam that’s mounted on the mine cart. But you’re going to have to figure out how that crazy mine cart works
Roam Through the Dome
If you haven’t gotten through the wall of this place, then go back to the previous section. If you have… maybe not what you expected, huh? Now before we move on, spend some time thinking about what happened when you walked through the wall/dome. Really… think about it! There is a method to what is happening, and it will be very helpful to understand it.
AND…
Don’t forget to chat with C.W. again. As always, he’s got a few things to say. And this time it starts to get a bit complicated, a little more big picture, and a little less linear. Deep breath!
- The Dome - As you pass through the dome, you don’t go through to the alien landscape. Instead, you end up in another section within the dome. Try it a few times, just to get your bearings and figure out what leads to where… and why. This is going to open up a few new areas…
- Upper Plateau - One of the first areas where you may go through the dome is over by the graveyard. If you do, you’ll end up in an upper plateau above the river. Take a look around. You’ve got a good view from up here, and you may be able to put some things together. Remember that gate over the river, that you pivoted to get through — take a look at it from up here.
- Shimmering Rocks in a Tunnel - By now you should have run across some shimmering rocks — certainly in the workshop, but hopefully in a little corner of Hunrath not far from where you started. Playing in the workshop should have revealed what you can do to those shimmering rocks. That will open another path.
- The Scrapyard - Progress for sure! If you made it through the tunnel, you are now in the upper scrapyard. This is where all the new stuff that comes to Hunrath gets checked in. More importantly, it also has a great way to get down into the junkyard below you - that you haven’t been able to get to until now.
- Inside the Junkyard - Inside the junkyard there is plenty to look at, but really it’s all about more power. Remember the distribution panel on the outside of the junk yard? Well, look at it from this side, and get the power distributed. Then make your way into the gas station, where you should look around. There is a very alien looking device with blue blobs, rigged up to a digital cash register. This will come in handy. And don’t forget to open the garage door!
Story Bits
Whatever this dome is, it’s not meant to let you outside. The landscape outside is worth examining, but it doesn’t look like we’re going to get there. But it does look like the human inhabitants of this world have made use of the odd properties of the dome to make some short cuts here and there.
Access to the junkyard was protected by rocks, but getting past those and using this backdoor dome access gets us there. It looks like this is where all the stuff from new arrivers ends up being carried, sorted, and stored.
Some of the pieces and parts make it down into the junkyard behind the gas station.
Gameplay Hints
Getting through the dome is critical to opening up new areas and getting power distributed. If you’re feeling like you need some suggestions on what do to after the dome is breached, then proceed…
Subtle Nudge: Getting through the dome opens up new areas — you want to get inside the fence of the junk yard. Gentle Push: Getting inside the junk yard fence requires getting to the scrapyard area above the junkyard. The dome is the key to the scrapyard. Loving Shove: There is a backdoor through the dome that leads to the scrapyard. The shimmering rocks block the way. Body Check: There is a tunnel near where you first started that’s blocked by shimmering rocks. If you drive the mine cart, you can use it to get rid of the shimmering rocks. Go through the tunnel, the dome, the scrapyard, and the junkyard, and get more power on.
The Tower and the Tree
Hunrath is completely powered, and almost completely accessible. Now that the power is on, you should be able to get into Farley’s house and into the large tower in the middle of Hunrath.
- Farley’s Back Door - Remember that locked door on the backside of Hunrath that was recessed slightly into the rocks? It had a keypad. And now the power’s on. And you should have found a reference to the code on a note. All of those things will open that door and get you into Farley’s house, which is kind of a community center. Explore around, paying close attention to an old-style slide projector.
- Onto the Wall - Well hopefully you’ve learned some stuff at Farley’s… but now you need to make use of the information. In case you didn’t realize it yet, Hunrath has a big rock and stone wall that runs right down the middle of it. You can (and should) figure out a way to get onto that wall. The top of the wall leads to some interesting new areas of Hunrath and to the lower tower. (You will probably pass some strange looking machines — sphere-shaped contraptions on pedestals. If you activate and use them, you’ll need to go to other sections of this guide.)
- The Lower Tower - The top of the wall will lead you to a locked door into the tower that you should be able to open with information you gleaned at Farley’s. Inside the tower you’ll find the mayor’s office. Look around for information… one key piece is on the mayors desk — but you’ll have to decipher it. Oh, and unlock any doors from the inside — that’ll make getting around Hunrath so much easier.
- Other Side of the Top of the Wall - You may have noticed an elevator shaft in the mayor’s office — with an elevator that doesn’t work. To get to the elevator and get it working you’ll have to get to the other side of the tower. To get to the other side of the tower you’ll have to get to the other side of the top of the wall. There are a few things to be solved along the way.
- Tower Elevator - Another keypad — hope you were able to figure out the passcode. This one will get the power to the elevator turned on, which will give you access to floors you haven’t seen before.
- Top of the Tower - What a view! Seems like this is some kind of control area — check out those monitors and meters. Explore around, take a few notes.
- Under the Tower - The basement floor of the elevator is somebody’s living quarters. It leads to some mechanical equipment that you should investigate.
- The Tree is Open for Business - If you’ve investigated well, you should have access to the Tree. As you know already, the Tree plays some kind of special role in this place — and other places.
- Under the Tree or Other Places - At this point you can explore down under the Tree, and then go back to the devices and go to other places. Either way, you’re moving out of Hunrath and on to new worlds.
Under the Trees
Down the Rabbit Hole
If you’ve come this far you must know that the key to what C.W. is trying to do is all about connecting the trees. So, let’s do it.
Water, Roots, and Portals - What is this place? This is where the roots of the tree seem to feed, and feeding them seems to involve letting them have water. And the equipment seems to monitor the health. And then those crazy, crazy pathways through the universe — they link things in rather bizarre ways. It’s all about connection.
Story Bits
These Trees have an interesting history. Each of the worlds has a tree at its center that began growing when the world itself was taken. The trees go through various cycles as they mature, providing meetings and interactions for the various species along the way.
The story behind the Trees is unclear, but the process hints that the trees can reach fruition. What happens then is anybody’s guess. It was the postulation of what happens at fruition that spurred the monitoring and governing of the Trees’ energy. What would happen? When would it happen? Where would things end up? Some of the inhabitants thought it was better to control such things rather than let them just happen.
Gameplay Hints
Get everything healthy and connected. In case you didn’t get that from C.W. we’ll just spell that part out.
- Subtle Nudge: All trees need water. Start there.
- Gentle Push: The water down here seems to have been pumped out — not good for tree health.
- Loving Shove: Hmmm. What might be a great place to store water in Hunrath?
- Body Check: Find your way to the water tower in Hunrath (through C.W.’s workshop). Open that valve, then open the valve in each “heart” beneath the Trees. This will start restoring the Tree health, AND open the portals between worlds.
The Cliffs of Kaptar
The Cliffs, Plateau, and Another Beam
Congratulations! You made it to an entirely new world using a device up on the cliffs of Hunrath. (There’s another device up on those cliffs that might have taken you elsewhere — make sure you’re in the right section of the guide.) This is Kaptar, which has an entirely different feel than Hunrath. This place isn’t from Earth, its from somewhere else, and it’s inhabitants are from somewhere else. It’s a very vertical place with cliffs and clouds.
- How You Got Here - Before you rush off, you may want to think about how you got here. There was a crazy device, with a kind of seed, then a circle of light, then some flashy, blinky particles, and you were here. But what all came with you? Think about it, then move on.
- Turning Bridges - Now, onto the first odd structure in the world — a bent bridge that you should be able to use to get across a chasm. Seems like there’s a nice updraft in this world.
- The Cliff Path - Don’t look down — oh, well go ahead. Enjoy the path along the edge, and don’t forget to stop and smell the… uh… lichen?
- Temple Plateau - You’ve reached a plateau - literally. And there is plenty to explore here. There is ancient equipment and an even more ancient temple carved out of the stone. The Tree is here — behind a wall. And another one of the crazy red beams - evidently this place has been battened down for the battle, too.
- Chain Terminal - Up a set of metal stairs, there’s some kind of giant transport device, with chains leading off into the distance. Bet that’ll be working at some point. Look down and there are some stairs in the metal plates below.
- Stairways Up and Down - There are some stairways that are not immediately evident leading off the plateau. One leads down to the metal plated area under the chain terminal. The other leads way up to a large cavern that houses a massive crankshaft-looking piece of equipment. If you want to explore there, you can jump to that section of the hint guide.
- Another Beam - You should eventually make your way toward the red beam. It appears to be exactly like the one in Hunrath, but you can’t get close to it, because of a sphere of wood boards and red rock. Oh, and there’s a crazy seed machine in that sphere, too.
Story Bits
Kaptar has layers of history. Long ago a civilization built temples to honor the giant creatures that flew among the stone cliffs of Kaptar. At some point in history, changes took place, and the temple-builders were supplanted by a race of mechanically inclined hunters — and they were intent on capturing the giant creatures. The equipment and temples left behind are all that remains of these ancient cultures.
But through all of that, the Arai existed and survived. They were the original inhabitants and the sole survivors. Their manifestations are interesting… starting with a barnacle-like gestational stage, progressing to a flying crustacean-like stage, and for a chosen few a morphological change to a more human-esque polyarch. The polyarchs are the brains, and the flying creatures are the pawns.
Layered onto all of that history are the changes that have been brought here by other species, including the humans of Hunrath.
Gameplay Hints
- Subtle Nudge: Maybe there is some kind of device you could use to disable that red beam.
- Gentle Push: Maybe you could use the same blue beam device you used in Hunrath.
- Loving Shove: You should think about how the crazy seed machines work. They move chunks from one world to another world. Sure would be useful to have a chunk of Hunrath with that blue beam rail car moved right here to Kaptar.
- Body Check: The seed machines swap chunks between worlds. Go to Hunrath and drive the blue beam rail car to this chunk, then swap it back here and disable the red beam.
Crankshaft Cavern
Well, now, isn’t this huge and intimidating. Calm down. It’s just a massive power generator and distribution system of some sort. As we all know, power is a good thing — may open some doors.
- Standing on the Edge - Take a look out into the cavern from the edge. From the sound of things, there is a brisk breeze blowing up through this place. There are some metal gangplanks and stairs leading out to the massive crankshaft. And below all of that are some huge fins or blades of some sort.
- The Metal Pathways to Power - The metal pathways lead over to the core of the giant device. There are various levers and valves. You’ll know when you’ve pulled the right ones in the right order.
- Final Connections - Once things are running, there is a cylindrical control area that is accessible back along the edge of the cavern. This control pod allows for the power of this grand crankshaft to be distributed to other areas — possibly making things work that didn’t work before.
Story Bits
Much of the caverns here were carved out for temples and then hijacked for mechanized utility. What you’ll find are large mechanical structures that have been modified or augmented mainly by the other species in order to make their way through Kaptar.
Gameplay Hints
- Subtle Nudge: I hear wind blowing in this cavern - it might be enough to power things.
- Gentle Push: Get this huge piece of equipment powered and sending. Loving Shove: There is a pinion gear, a crank, and a clutch - it’s all about the order. If the crankshaft is spinning you’ll need to find another control for transmission of that power.
- Body Check: The lower pinion first, which lets you crank the valve to start the huge wind blades. Once those are spinning go up the stairs a bit and engage the clutch. Now back up to the (now open) transmission control device. Point it at each of the four catch-points and engage them.
Ride the Chains
You’ve enabled the dome, and you’ve turned on the power. Those two things should combine to allow you to explore new areas. Those large chains lead somewhere, and are just begging to be ridden, but there’s more to it than just hopping in.
More to Explore? - Go ahead, wander aimlessly for a bit. Surely something has opened up, right? Hmmm. Same old places — just a little noisier with all that equipment running. Time to slow down and think about the situation.
Story Bits
The equipment here was used primarily for hunting and processing the giant creatures that flew here. The huge ominous hooks were baited with Arai and moved into position to fish the beasts from the sky. You can see (and take advantage of) the huge chains used for capturing and transporting the creatures for processing.
Gameplay Hints
- Subtle Nudge: Take a long look at the map painted in the wooden shack near where the red beam was.
- Gentle Push: There is more than one way to get somewhere in these worlds, the direct way, and the back door.
- Loving Shove: Maybe riding those chains means getting in on the other side. There’s a spot near where you swapped into this world that might work.
- Body Check: Go back to the rotating bridge where you started in this world. There’s a large metal beam that you must release to rotate the bridge to a new position. Now you can get through the dome and to the other side.